Friday, July 26, 2013

Stamps & Coloured Modeling Paste!

Hi, Everyone,

Art Journaling has crossed over to my scrapbook layouts!

I absolutely LOVE Modeling Paste & have started to colour my Modeling Paste with Lindy's Stamp Gang Color Shots.  This dry mica powder is excellent to add to any medium (modeling paste or gel medium) & you can add as much or as little colour as you want to personalize the colours you use in your projects.

Below is the background I created using stamps with black Archival Ink, a film strip die, & 2 strips of the new Bohemian Graphic 45 papers.


In a small container I scooped some Modeling Paste & gave it a mix.  Then I dipped my stir stick into the container of dry Lindy's Stamp Gang Color Shot powder, then added this small amount of powder to my Modeling Paste & mixed it again.  I used the colour "Baby Blue Eyes" & loved how the colour is not too subtle or not too over powering.  The stencil is from the Crafters Workshop by Dylusions.

Once the Modeling Paste is dry, I used double-sided tape to attach the 2 pieces of Graphic 45 paper to the layout.  My projects need metal so I clipped on 2 paper clips to the photo then glued the photo to the photo mats.  Then I added 3 strips of Washi tape/tissue tape to the bottom of the photo mats & to the top right mini-collage.  I doodled with a Precision Pen along the top, left & bottom of the layout to finish it off.


Imagine the various layouts you can create with your Stamps & Coloured Modeling Paste!

Have fun creating!


Tuesday, July 23, 2013

Technique Tuesday - Bolt Album

Hi, Everyone,

It's Technique Tuesday & today we are going to learn how to put together a Bolt Album like this. . .


. . . so let's get started.

We will be using the Idea-ology Ruler Binding created by Tim Holtz.

The pages of our Album will be made from coin Envelopes with Tags as inserts.

The front & back covers will be cut from Chipboard.  I have also cut grey cardstock shims which will placed in between the envelope pages, which will increase the spine thickness to allow for some thicker embellishments on the pages. 

I took 1 of the rulers from the package, marked the holes on the envelopes, then punched the holes with a cropodile.

These are the tags we will be using as inserts in the envelope pages.

All the hardware you need to create the Bolt Album comes in the package.

Again, I took 1 of the rulers from the package, marked the holes on the front & back covers, then punched the holes with a cropodile.  In order for the covers to open wider, we need to score the width of the ruler, which is 1". 

Now to assemble the Album, insert the 2 screws through the ruler then through the back cover.

Next we add a cardstock shim to increase the spine thickness. . .

. . .then layer envelope, shim, envelope, shim. . .

. . .until we have attached all 6 envelope pages & 7 shims.

Next we attach the front cover, another ruler. . .

. . .2 washers. . .

. . .& the 2 wing nuts.

I always use Scor-Tape when creating Books.  It is Extremely Strong & your book will not fall apart.  Because it is so strong you have no wiggle room, so be careful. Once it's stuck, it's stuck so line your paper up carefully.

I love envelopes & decided to cover the front & back covers with them.  Treasured Memories has a wide selection of vintage envelopes in the Ephemera Cabinet.

Remember, be careful with the Scor-Tape.

This is what the front & back covers look like with the vintage envelopes attached.

I always apply gaffer tape, masking tape, or hockey tape to the scored portion of the covers.  The tape adds flexibility to the covers & stability to the scored section so it does not break off.

Here is the finished Bolt Album.

Everyone coming to this Friday Night's Smore Crop at Treasured Memories will get a Smore Bolt Album to put their favourite Smore recipe in.  Phone the store to sign up!

Have fun creating!

Monday, July 22, 2013

New Computer!

Hi, Everyone,

I'm trying to expand my computer knowledge to import & share photos with you from my new Mac Desktop & MacBook Air.  This is a HUGE learning curve with you in mind so I can share my creativity with you.


Success!

Have fun creating!

Sunday, July 21, 2013

Art Journal Night - Thursday July 18, 2013

Hi, Everyone,

What a fun Art Journal Night we had!
There were 16 enthusiastic ladies creating up a storm using Texture, Texture & more Texture.

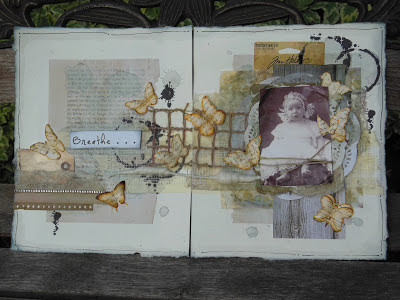
We created the following 2 page layout that evening:


When you have wired wool in your stash of texture . . . you get a little silly . . .


You ladies are Amazing.

Have fun creating!

Saturday, July 6, 2013

Art Journal Night - July


Hi, Everyone,
I will be hosting this month's Art Journal Night at Treasured Memories.  Have a look at these beautiful pages.

Art Journal Night - July
Thursday, July 18
6:30–8:30 p.m.
$20


Class Description:
Texture, Texture & more Texture!
Learn how to use layers & layers of Texture to create these 2 amazing Art Journal pages.  We will be making our own Tea die to subtly blot on & edge the page!

Phone the store at 780-414-1540 to sign up for the class.  If you have any questions, please e-mail me at ksundby1@hotmail.com.

Please Bring:  Matt Gel Medium, Gesso, paint brushes, foam pop-dots, ink dauber, black Precision Marker, “Weathered Wood” Distress Ink

Have fun creating!


Tuesday, July 2, 2013

Altered Blocks

Hi, Everyone,

It's Technique Tuesday!

Today we will be talking about Altered Art.  It is exactly that.  Art that is Altered.

Altered Art . . . is altering or combining Existing works of art to produce New pieces of art.
It is also . . . the alteration of everyday objects into decorative pieces of art
as well as . . . Recycling & giving new life to common items Not associated with art turning them into creative works of art.

At the last Mixed Media Meeting at Treasured Memories, we were given 16 wooden blocks to create with.  To the meeting I brought a discarded pre-painted marbled canvas, some saved pieces from a broken project (an altered yardstick that I picked up at an antique store & a tiny broken wooden train set), a photo of 2 old ladies waiting for a train in Paris, & some old Graphic 45 papers.  With some Matt Gel Medium, Fabri-tac, & various watch parts I created my own Altered Art with wooden blocks & recycled items.

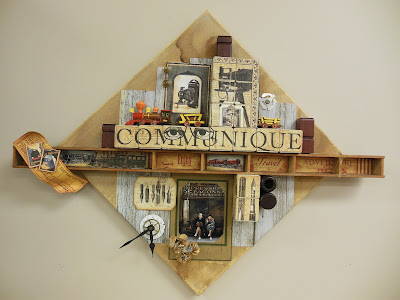
Below is the finished work of art.
I started off by cutting a wood grain piece of paper into vertical lengths, staggering them as I glued them to the canvas with matt gel medium.

Next I mended the yardstick with Fabri-tac & glued on some train images found in Daryl's Ephemera Cabinet at Treasured Memories & glued the yardstick to the canvas with Fabri-tac (drying time is approximately 10 minutes & heavy metal objects are still stuck to my art hanging on my walls 12 years later).  I cut the papers to fit the exposed sides of the wooden blocks & adhered the papers to the blocks with gel medium.  The blocks were then glued to the canvas with Fabri-tac.  After the broken wooden train received some TLC it too was attached to the blocks & canvas with Fabri-tac.

The photograph of a vintage camera from an old Graphic 45 Communique paper line was attached with gel medium.  My BFF Roxane (a.k.a. The Clock Lady) gave me these fantastic clock parts & springs seen below.  OMG they are amazing!  (These were attached with E-6000 only because I left it at the store overnight to dry, otherwise I would have used Fabri-tac because I do not have the patience to wait many hours for glue to dry - my character flaw.)

The recycled watch face, gears, clock hands & watch spring (can you see it hanging off the clock key?) are amazing on this project.  I love the old paper photo frame holding the photo of the 2 old ladies.  (I laughed out loud when I saw this photo because I saw it as Roxane & I years from now in Paris taking a break from wandering through the many magnificent antique markets.  I'm the cranky one on the right in the fur - too funny!)  I like gluing metal pen nibs onto pen nib images to add dimension.

I had some extra Foil Roses left over from a previous Technique Tuesday post (March 19, 2013) which also looks amazing under the photo.  Other recycled wooden game pieces were also glued to the canvas with Fabri-tac.

Here is a view of the wooden blocks stacked on the canvas as well as a leftover gear brad & train car.

Here is a closer look at that watch spring hanging off the clock key,

here is a closer look at the foil roses,

& here is a closer look at that pen nib & clock key.

I love how this Altered Art piece turned out!


The next time you are at the store, stop by & check out the various wooden blocks & other unique items that can be turned into your own Altered works of Art.

Have fun creating!

Monday, July 1, 2013

Zipper Bracelet!

Hi, Everyone,

I'd like to introduce you to Ann Kerr. 
I introduced myself to her while she was shopping at Treasured Memories.  How could I not, when she always has on the most amazing unique handcrafted jewellery.  Every time she comes in to the store she is wearing one of her handmade original pieces of jewellery . . . either steam punk or gear inspired with watch faces, watch parts, zippers and anything eclectic.   I really LOVE her glasses too!


Check out the amazing zipper bracelet she created.


Or should I say the amazing 2 zipper bracelets & zipper necklace she created.


Oh, and did I mention the zipper earrings.


I absolutely love things created from zippers.  I have zipper flowers on my apron, zipper flowers on a necklace, & even zipper flowers on a pair of shoes.  Now, I have a zipper bracelet to match!  


Thank you Ann for selling me the bracelet off your wrist!

Have fun creating everyone & I look forward to seeing more of your creations Ann.